Home Instructions and How to DIY
CLICK ON A TOPIC BELOW TO LEARN MORE
Children’s Guideline for Living with the Family Dog
- Talk in a normal voice without screaming or yelling.
- Approach the dog calmly and do not run.
- Make a fist and let the dog sniff it before petting the dog gently under the chin with adult supervision. If the pet is calm,
- the child can then gently pet the head and back.
- Be kind and do not hit or jump on the dog. No pulling ears or tail.
- Play fetch instead of roughhousing or tug of war.
- If the dog is tired, let them rest/sleep.
- When crated, do not bother the dog.
- Praise the dog for things done right.
- If the dog is jumping, chasing or biting, turn away from the dog/puppy, tuck in your arms and get an adult.
- If permitted by your parents to give commands to the dog, use one word commands. (eg.“sit” vs “sit down”)
- Help feed the family dog. Do not give in between snacks and never give “people food”. This can make them very sick!
- LOVE AND RESPECT YOUR FAMILY DOG!
Feline House Soiling
House soiling is one of the main reasons pet owners relinquish their cats. Unfortunately, these cats frequently end up in shelters and are eventually euthanized.
House soiling is multi-factorial in its origin. Contrary to popular belief, cats do not soil out of anger or revenge but due to any number of physical, social or medical factors.
BASIC REASONS FOR HOUSE SOILING:
- Environmental and Social Factors
- By nature cats are clean and private.
- They therefore need quiet, unsoiled locations to eliminate. This is especially true in multi-cat households.
- Avoid high traffic areas.
- Avoid negative experiences related to the litter box such as medicating near the box, small children bothering the cat in the box, noisy appliances (washing machines, furnaces, clothes driers, etc.).
- Prevent another more dominant cat to block access to every box at one time.
- Marking Behavior
- Cats mark territory via scents and behaviors which include urination, middening (fecal deposits), rubbing and scratching.
- Unneutered male cats and non-spayed females will mark territory as part of their sexual behavior. Neutering and spaying will dramatically reduce this behavior.
- Anxiety may facilitate marking due to changes in the cat’s environment.
- Windows and entry ways may be marked in response to perceived threats such as unaltered cats just outside these areas.
- Medical Issues
- Medical problems can cause a cat to avoid the litter box, relating the discomfort of the medical problem with the litter box. The cat therefore soils outside the box.
- Problems may include bladder infections or inflammation (cystitis), arthritis, kidney problems, diabetes, etc.
- Your veterinarian needs to rule in or rule out medical issues when determining the cause of your cat’s house soiling.
- Tests may include a urinalysis, complete blood count, biochemical profile, abdominal ultrasound, fecal testing, radiography, urine culture, rectal exam, etc.
- Feline idiopathic cystitis (FIC) is a frequent medical cause of house soiling and your veterinarian will test and determine if this is present.
TREATMENT AND MANAGEMENT
- Spay or neuter
Spay or neuter all cats as early as your veterinarian advises. - Litter Box
- In general you should have one litter box per cat plus one.
- Locate the box away from food and water.
- Place the box in a quiet, private area.
- Keep litter boxes apart and in various locations.
- In multi-level homes, place boxes on each level.
- The bigger the litter box the better. At least 1.5 times the length of the largest cat.
- Older cats need a low entry to compensate for diminished mobility.
- Litter should be unscented.
- Different litter textures and depths may help minimize house soiling.
- Remove waste at least once a day.
- Add litter as needed.
- Wash the litter box thoroughly every 1-3 weeks with soap and water.
- Eliminate Marking Triggers
- Keep roaming cats away from your home via motion activated water sprinklers, upside down carpet trends (spikes up) in front of sliding glass doors or other humane deterrents.
- Utilize microchip or magnet operated devices to only allow access of your cat(s) via a pet door.
- Clean soiled areas with floor/furniture cleaning machines (eg. Green Machine, etc.).
- Apply microbe based products (eg. Anti Ichy Poo) to cleaned areas to eliminate any residual urine we cannot detect but the cat might.
- Utilize synthetic feline pheromones (eg. Feliway) to diminish social anxiety which can trigger house soiling.
- Medical Treatment
- Follow your veterinarian’s medical management exactly as prescribed.
- Management may include antibiotics, anxiolytics and/or semi-synthetic glycosaminoglycans.
- DO NOT SELF MEDICATE!
If unsatisfied with the treatment and results of your cat’s house soiling ask for a referral to a board certified animal behaviorist.
Flea Control
Fleas have a lifespan of 1 to 9 months. While feeding on your pet, a female flea lays numerous eggs. The eggs develop into larvae which mature in about 3 weeks. The larvae then spin a durable cocoon. They pupate in their cocoon for about a week or more and then emerge as adults when stimulated by the environment. This many times is just the vibration of a pet as it walks by the cocoon. During that 1 to 9 months, a pair of fleas could potentially produce 222 trillion relatives!!
Adult fleas are relatively easy to kill, while the eggs and cocoon are very protective. So how do we combat fleas?
- You must deflea your pet and your home.
- Do not try to deflea your yard. This will only contaminate it with toxins and will not keep the fleas away.
- Regularly wash your pet’s bedding
- Vacuum your home weekly, making sure to vacuum furniture and all cracks and crevices everywhere. Fleas hide in these, away from the light.
- Groom/wash your pet regularly with approved veterinary shampoos. But do not shampoo 48 hours prior to and after topical flea product application. This removes the body oils that are required for these products to work.
- Apply veterinary approved, once a month, topical flea products such as FrontlineR, AdvantageR or ComfortisR. NOTE: Other, cheaper products have been shown to cause neurologic disorders in pets!
- Utilize oral veterinary approved products (instead of topicals) such as NexGard (1x/month) or Bravecto (1x/3 months).
A fast and easy way to check for fleas on your pet is as follows. Place your pet on a white surface. An old cloth or paper towels will do. Vigorously rub, brush or comb the hair near your pet’s tail. Be sure to brush against the lay of the hair. Look for any small black particles about the size of ground pepper. If you see any, place a few drops of water on them. If they dissolve into reddish-brown splotches, that is evidence that your pet has fleas.
Some pets may develop an allergy to the flea bite/saliva. The result is extreme itching, scratching, chewing or rubbing the skin.
ALWAYS CONSULT YOUR VETERINARIAN. Not all products are safe for dogs and especially cats. In severe cases, an professional exterminator may be brought in to help establish control.
Food Trial for Suspected Food Allergy
Food allergies are the body’s reaction to an antigen/allergen, usually a food protein. But people need to remember two things.
- There currently is no test to pinpoint a food allergen. Diagnosis is via elimination.
- Once the allergen(s) are identified via elimination, that/those products need to avoided forever! Even the smallest amount of an offending allergen can re-establish the allergic reaction.
The following layout can be used during the diagnosis of food allergies.
PREVIOUS EXPOSURE (INCLUDE PROTEINS, CARBS, FATS, DYES)
TRIAL PERIOD (4-6 weeks)
- Diet (dates) Response:
- Diet (dates) Response:
- Diet (dates) Response:
- Diet (dates) Response:
PROVOCATION (1-3 days)
Date Item Reaction (pos/neg) Does removal stop reaction (Y/N)
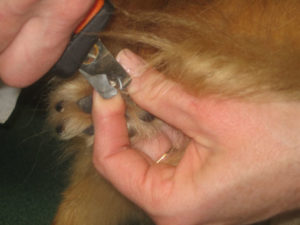
How to Brush Your Pet’s Teeth
There are a myriad of items used to help clean your pet’s teeth. Some are food additives, others are in the form of foodstuffs and still others are tools or application products. Still the best way of maintaining your pet’s teeth after veterinary cleaning or prior to plaque/tartar deposition is via brushing. Brushing is not as difficult as one might think provided we follow some simple steps.
- Get a child, soft bristle tooth brush and veterinary tooth paste. Pet’s do not like to foaming action of human tooth paste and any swallowed can cause gastro-intestinal disturbances.
- Place your pet in a quiet, comfortable environment where you can keep the pet stationary with minimal restraint.
- Approach your pet from its rear and from under the chin. Approaching from above and the front is a threatening posture.
- Load the tooth brush with a small amount of paste (preferably an enzymatic paste) and with the brush in your dominant hand, use your other hand to gently lift the lip on one side.
- Starting at the front and from below, brush the upper teeth at the tooth/gum line in small elliptical motions.
- Continue to the rear teeth by separating the cheek from the teeth and brushing as before even though you may not be able to actually visualize the tooth surface.
- Once done with this quadrant, repeat the process on the top teeth of the other side.
- Repeat the process for the bottom quadrants.
- To be effective, you must BRUSH YOUR PET’S TEETH EVERY 3-4 DAYS!
NOTE: We do not usually brush the inside surface of the teeth unless the pet is extremely compliant. If attempted, be careful not to gag the pet with the tooth brush since this will spook the pet from further compliance. This is not a problem due to the cleansing action of the tongue on the inner surfaces. Furthermore, more plaque is deposited on the outer surfaces due to the entrapment of food particles between the teeth and cheeks post meals. This acts as an energy source for bacteria which grows and combines with the saliva to form plaque. Once plaque builds up, it irritates the gums causing them to bleed. The blood and minerals combine with the plaque to form tartar. If not removed, the tartar will wedge between the tooth and gum/bone to loosen the tooth and allow infection to proliferate.
If you and your pet are game, the results are well worth it. Healthy teeth equal a healthier pet!
If you are having problems, start by just gently handling your pet’s mouth and lips from behind and below, a little at a time.
How to Clean Your Pet’s Ears
Unlike humans, the ear canal of dogs and cats are “L” shaped rather than a straight tube. Their canals have a vertical and a horizontal component. When cleaning the ears:
- Start by saturating a cotton ball with the cleansing solution. Do not use a cleanser with alcohol in it due to the burning sensation this will elicit on inflamed ears.
- Be cognizant of how sensitive the ears may be due to inflammation. Be gentle but thorough. Repetitive wipes work better in many cases than too firm a wipe.
- Lay the wet cotton ball on the outer ear (pinna), let the cleanse loosen any debris and then wipe. Repeat as necessary to clean the outer ear completely.
- Once the outer ear is clean, again wet a new cotton ball as before and with the cotton wrapped around your finger, start cleaning the outer ear canal (vertical canal).
- Completely clean the outer most part of the vertical canal prior to going deeper. Repeat this procedure, going deeper only after the more superficial parts of the canal are clean. This prevents pushing debris deeper into the canal.
Note: You will only be cleaning the outer ear canal, while a small amount of cleanser will drizzle down further into the horizontal canal. This action will loosen deeper debris which the pet will bring closer to the surface by shaking their head. This is important because the ear drum (tympanum) is at the end of the horizontal canal and can not be reached with your finger.
Your veterinarian can clean the horizontal canal with the aid of sedation or anesthesia and special instruments.
It is important to clean the ears thoroughly and often enough to keep them clean so as to prevent infection or allow medication to properly treat infection.
How to Clean Your Pet’s Teeth
- Home care is intended to remove plaque before it progresses to hardened calculus and periodontal disease.
- Start slowly. Gently handle your pet’s face and mouth from under their chin. Massage along the cheek-side of the tooth and gingiva with your finger.
- If your pet resists, stop and calmly stroke their chin and comfort them.
- Once your pet accepts the handling of their mouth, wrap gauze around your finger and repeat the massaging action.
- If used to the gauze, add a small amount of pet toothpaste from your veterinarian. Never use human toothpaste. Pets will get gastric upset from human toothpaste.
- You can continue with gauze or start with a soft bristle pet toothbrush.
- Gently hold the pet’s mouth closed and lift their lip on one side to brush the cheek-side surfaces of teeth and gingiva. The inner surfaces of the teeth are usually OK due to the action of the tongue against their surface, therefore concentrate on the cheek-side surface.
- The entire process should only take a few minutes. Praise your pet after the session.
- To be effective, the cleanings should take place at least twice a week.
- Daily use of dental foods and chews are great adjuncts to biweekly cleaning.
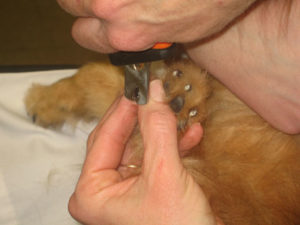
How to Clip Your Pet’s Toe Nails
- Make sure to have sharp toe nail clippers, preferably scissor action clippers that are large enough to minimize effort in cutting through the nail.
- Hold the paw firmly without hurting the pet. Keep the pet’s leg parallel to their body. Do not pull the leg out to the side of the pet since this is uncomfortable and will be met with resistance.
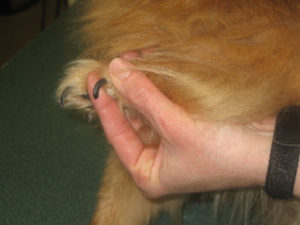
- Note on the diagram where the sensitive “quick” is located. (ie. blood vessels and nerve)
- Protect the “quick” with your thumb or finger and bring the clippers up to your thumb or finger. This way, if the pet moves you will not cut into the “quick”.
- Proceed with clipping the nails but if the pet becomes unruly, stop and try to calm the pet. If need be, postpone further clipping for a later time.
- If cut to close, stop the bleeding by plunging the cut nail into a soft bar of soap or use a commercial styptic stick.
- Practice makes perfect but do not be afraid to utilize professionals such as your veterinary staff.
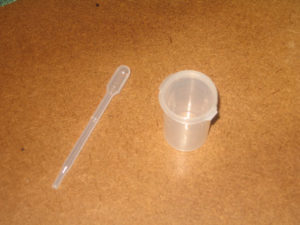
How to Collect a Urine Sample from a Cat
Many times your veterinarian will need a urine sample to help diagnose lower urinary tract problems, kidney disease, endocrine problems or the help in determining treatment effectiveness. Collecting a sample is simple.
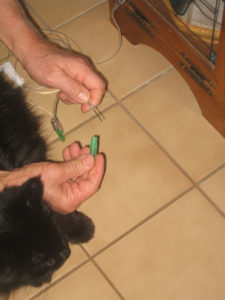
- You will need a disposable, clean pipette and a clean, sealable vial or container to collect and transport the sample.
- You can use one of the many non-absorbable litter products available and a clean litter box. Then simply tilt the box to gather urine in one corner and collect it with the pipette and transfer the urine into the container for later analysis.
- Another simple method is, change the litter in the box with clean litter (same as what you have been used) but then place the box in a thin plastic garbage bag in such a fashion that one layer under the box and the other layer lies on the litter.
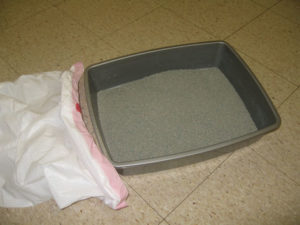
- Tuck the end of the bag under the box to secure it.
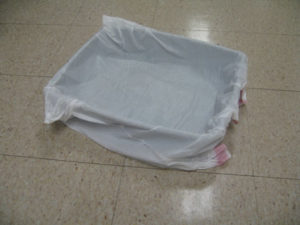
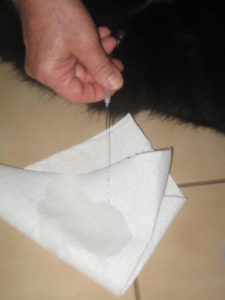
- Your cat will pucker up the plastic in digging to urinate but will inevitably urinate on the plastic
- Some urine will be lost into the litter below, but enough urine should remain in little puddles that can then be collected via the pipette.
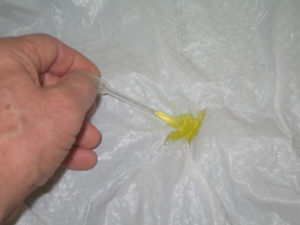
- Simply transfer the aspirated urine into the clean container. You’ve got your sample!

How to Medicate Your Pet
Most cats will not eat food with pills or paste added to it. Some cats are easier to pill than others. Do not under estimate the ability of your cat to resist pilling to the point they can inflict harm to their handlers. Many cats respond better to minimal restraint so start out gently and adjust as necessary. Note it may be necessary to use two people and/or special equipment to pill your cat. Ask your veterinarian for a pilling tool or paste if the following scenario requires adjustment.
Cats: Tablets
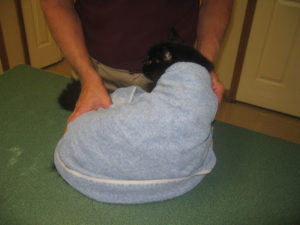
- Wrap your cat in a towel snuggly with only their head exposed.
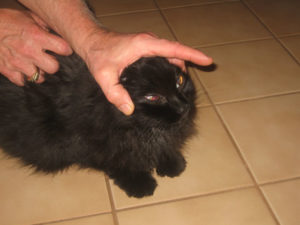
- Hold the cat’s head from above in the palm of your non-dominant hand. Secure the head via the large cheek (zygomatic) bones and tilt the nose upward.
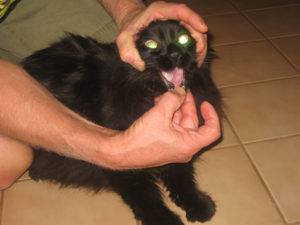
- With your dominant hand, open the cats mouth by prying the lower jaw down with your index finger placed between the large canine teeth.
- Once open, push the cheeks into the mouth between the back teeth with the fingers holding the cheek bones. This will discourage the cat from closing their mouth, since doing so will cause them to bite themselves.
- With the nose pointed skyward, drop the tablet over the back hump of the tongue. Then quickly push the tablet down the throat with your index finger.
- You can then hold the cat’s mouth closed, blow in their face and stroke their throat.
- When giving pills, always administer 2-5 ml of water thereby helping wash to pill down to the stomach. (Leaving this step out may allow pills to damage the throat.)
NOTE: Steps 4-6 need to be executed in smooth, rapid fashion. DO NOT get bit!
Dogs: Tablets
You can many times wrap the pill in something tasty but sticky such as soft cheese, peanut butter or ground meat and the dog will eat it down.
If this does not work:
- Back your dog into a corner or against something minimizing movement away from you.
- Hold the dog’s head/muzzle from above in the palm of your non-dominant hand. Secure the head via the large cheek (zygomatic) bones or muzzle and tilt the nose upward.
- With your dominant hand, open the dog’s mouth by prying the lower jaw down with your index finger placed between the large canine teeth.
- Once open, push the cheeks into the mouth between the back teeth with the fingers holding the cheek bones. This will discourage the dog from closing their mouth, since doing so will cause them to bite themselves.
- With the nose pointed skyward, drop the tablet over the back hump of the tongue. Then quickly push the tablet down the throat with your index finger.
- You can then hold the dog’s mouth closed, blow in their face and stroke their throat.
- When giving pills, always administer 2-5 ml of water thereby helping wash to pill down to the stomach. (Leaving this step out may allow pills to damage the throat.)
NOTE: Steps 4-6 need to be executed in smooth, rapid fashion. DO NOT get bit!
Cats and Dogs: Liquid
1) Wrap your pet in a towel snuggly with only their head exposed. Back your dog into a corner or against something minimizing movement away from you.
2) Hold the pet’s head from above in the palm of your non-dominant hand. Secure the head via the large cheek (zygomatic) bones (or muzzle of non-brachycephalic dogs) and tilt the nose upward.
3) With your dominant hand, open the pet’s mouth by prying the lower jaw down with your index finger placed between the large canine teeth.
4) Once open, push the cheeks into the mouth between the back teeth with the fingers holding the cheek bones. This will discourage the pet from closing their mouth, since doing so will cause them to bite themselves.

5) With the nose pointed skyward, administer the liquid over the back hump of the tongue. Do not propel the liquid in too harshly in order to avoid it going down the pet’s windpipe.

How to Teach Your Dog Manners
Dogs are pack animals and naturally look for a leader. Just like children, they need boundaries and direction. Without these boundaries and direction, your dog may become hyperactive and can lead to barking, chewing and possibly aggression. You do not have to physically dominate your dog. In fact, too much domination can provoke fear biting. Aggression works in the dog world, but aggression from human to dog will generate fear and mistrust. Just as it does in the human world. Most dogs are happy to submit to a leader. They can gain confidence and a sense of security with you as their leader. So how do we show the dogs that we are the leaders and they should follow? We ask them to defer and wait for everything they receive. Nothing in life is free.
Make your dog sit and stay, then look and wait for the OK signal before:
- Receiving attention or being pet, touched or groomed
- Going out or coming in the home
- Entering a room
- Climbing onto furniture
- Eating meals or treats
- Putting on their leash or collar
- Greeting people
- Getting in the car
- Playing with or giving up toys
Praise your dog anytime they comply with your commands.
If your dog whines, paws or disobeys, have them again sit, stay and look for the OK signal.
If your dog ignores you, repeat your command. Use their name and stand in front of them while repeating your command.
Only wait a few seconds between command and OK signals.
THESE EXERCISES ARE TEACHING YOUR DOG MANNERS AND HOW TO SAY PLEASE!
Instructions for Separation Anxiety
- Increase the pet’s exercise level. Mental exercise, like exploring new places and encountering new smells should be implemented. Boiled shank bones, toys that can encompass a treat or a key toy are great for mental stimulation.
- Ignore attention seeking behavior. This may be difficult, but must be done to avoid reinforcing inappropriate behavior. Do not talk to, look at or touch the pet. If need be, leave the room.
- Try graduated departures from your home. Start with 30 seconds and increase the amount of time in very, very small increments of 30 seconds. If there are any signs of anxiety (eg. vocalization, salivation, destroying things, etc.) go back to the amount of time that did not elicit these results. Then gradually increase the time away. Repeat as needed.
- While increasing the departure time, counter condition by giving the pet a distraction such as toys stuffed with treats or a boiled 4-6 inch shank bone.
- Desensitize the pet to pre-departure cues such as routines for dressing, picking up your keys, getting your coat, etc. Accomplish this by varying the routine each time.
- Down play departures and arrivals by ignoring the pet for 10-20 minutes prior to leaving and upon arrival.
- If possible, videotape the pet while you are gone. This can help to fine tune treatment.
- Anti-anxiety medication may be used to help bridge the training and successful behavior modification. Please follow the directions precisely.
Note: medication alone can not cure separation anxiety.
Insulin Treatment (Injection) of Pets
Insulin treatment is absolutely necessary in the pets suffering from Type 1 diabetes mellitus. Yet the administration of insulin is really not difficult. Furthermore, the “shot” itself is painless due to the very small caliber of the insulin needle. Lastly, the chances of causing damage with the administration of insulin (provided the dosage is correct) are slim.
At your pharmacy, you should purchase insulin, insulin syringes and needles with the accompanying prescriptions. Insulin should be refrigerated at all times and the bottle must be gently inverted several times prior to withdrawal of the insulin into the syringe. The injection must be given subcutaneously (beneath the skin). The amount of insulin required may be subject to change depending on various factors such as alterations in diet, exercise, and certain environmental stresses. The amount of insulin required will be determined by measuring the amount of sugar in your pet’s urine each morning prior to insulin administration. Increases in insulin dose should only be made if 3 consecutive days have urine glucose readings greater than 2+. Decreases in insulin dose may be made daily if urine glucose readings are negative.
Insulin administration should be as follows:
- After removing the insulin from the refrigerator, gently roll the bottle between your hands until all the settled product is dissolved.
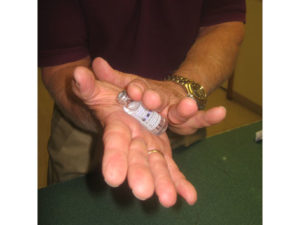
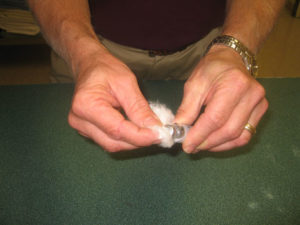
- Swipe the insulin bottle septum (top) with rubbing alcohol and allow to dry. This will eliminate bacteria which might be carried into the bottle when the needle is introduced.
- Remove the needle cover and then keep the needle from touching anything before introducing it into the insulin bottle.
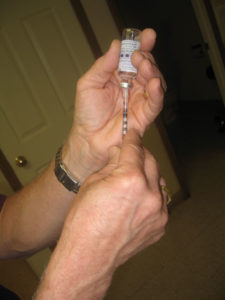
- With the needle in the insulin bottle, invert the bottle and draw up approximately twice the amount of insulin you are going to administer. Then “flick” the hub of the needle, causing any air to bubble up to the top of the syringe.
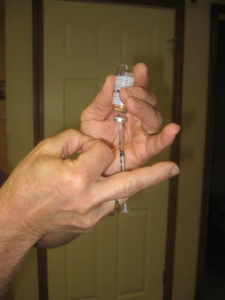
- Inject the “extra” insulin back into the bottle until only your proper dosage remains.
- Remove the needle/syringe from the bottle and recap/cover the needle without having the needle touch anything. Now we will get our victim (pet).
- Place the “loaded” syringe within arms length of where you will treat the pet. Loosen the needle cover just enough to allow the syringe/needle to be removed with one hand. Remember to never allow the needle to touch anything other than the inside of the needle cover.
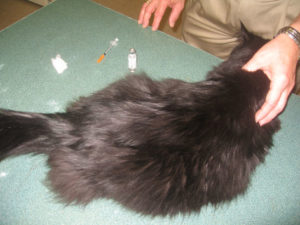
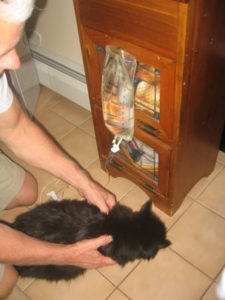
- If your pet is calm, no additional restraint is needed. If your pet is not calm, either wrap them in a bath towel with their head exposed (cat or small dog) or corner them between your legs, you and a wall, you and a piece of furniture, etc.
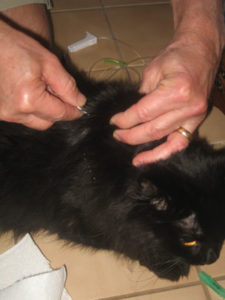
- Gently but firmly grasp a pinch of skin between thumb and index finger pointed toward the rear of the pet at midline just above the pet’s shoulders. Draw the skin up, forming a “tent”.
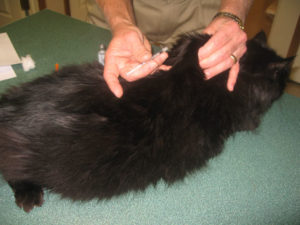
- While holding the skin, introduce the needle into the middle of the “tent” with the syringe and needle parallel to the pet’s back.
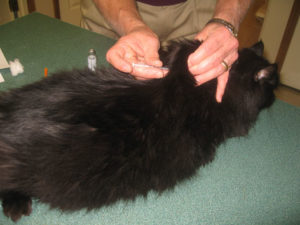
- Inject the insulin and remove the needle prior to releasing the skin.
- Praise, pet your victim and “assure them that no harm will come to them”.
- Recap the needle and properly dispose of the syringe/needle.
Nasogastric (NG) Tube Feeding of Cats and Dogs
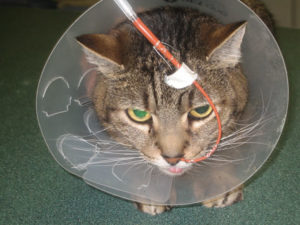
At times, your veterinarian may place a nasogastric tube in your pet’s nose (mostly cats) which goes down its throat to the animal’s stomach. This tube is used to feed the pet for a relatively short period of time (possibly a few days) while the pet regains its will or ability to eat on its own. Occasionally a pet may be sent home with an NG tube in place.
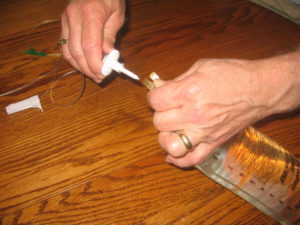
Proper feeding via the NG tube is accomplished as follows:
- Before attempting any feeding, examine the NG tube set up to assure the tube is still visually in place, secure and protected by an Elizabethan collar.
- Food for NG feeding is either pre-manufactured (eg. Esbilac) or finely strained, thereby affording the passage of the food through the tube without impediment. Your veterinarian should instruct you to which foods can be mixed with skim milk, water or another liquid prior to finely straining and collecting the mixture.
- Warm the food to approximately 90 degrees Farenheit.
- Uncap the NG tube and administer, via syringe, 1-2 cc of clean, warm water. If no cough is elicited, proceed to the next step. If the pet does cough, recap the NG tube, DO NOT administer any food and call your veterinarian.
- Draw up the predetermined amount of the mixture in a feeding syringe.
- Attach the syringe to the NG tube and with the pet stationary, slowly administer the mixture.
- Once the prescribed amount of food is administered, dislodge the feeding syringe and administer 2-4 cc of clean, warm water thereby cleansing the NG tube.
- Recap the NG tube.
Subcutaneous Fluid Administration for Dogs and Cats
Many times pets with chronic illness (eg. chronic renal failure), require fluid supplementation at home. Usually this is accomplished via subcutaneous fluid administration.
There are a few important items that one needs to be aware of:
- Equipment and fluid has to remain free of contamination. Therefore needles should remain capped until injected under the skin. Do not allow the needle or administration set connections on either end to touch any surfaces. Do not allow the fluid to become contaminated.
- Set up a clean, dry area which you can restrain/contain your pet and have all equipment within arms length.
Once you are ready to administer the subcutaneous fluids, follow these steps:
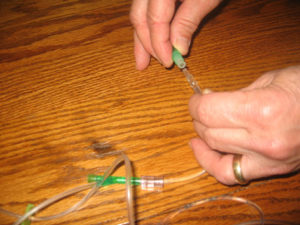
- Connect the administration set to a new bag of fluid (eg. 0.9% NaCl or Lactated Ringers).
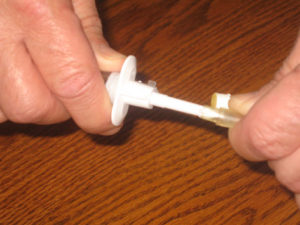
- Connect a 18 or 21 gauge needle to the administration set.
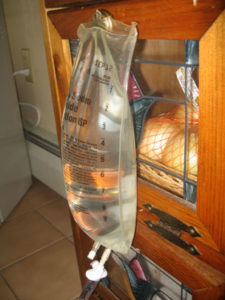
- Hang the bag on a hook 12-18 inches above the surface on which your pet will sit.
- Hold the needle hub while uncapping the needle (keep the needle away from all surfaces). Release the stopper on the administration set, thereby allowing flow of the fluid.
- Let the fluid flow until coming out of the needle. At this point, close the administration set stopper. Loosely recap the needle and lay it down within arms length.
- Get your pet in place.
- Gently but firmly grasp a pinch of skin between thumb and index finger pointed toward the rear of the pet at midline just above the pet’s shoulders. Draw the skin up, forming a “tent”.
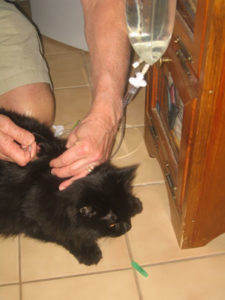
- Start the flow of fluid.
- While holding the skin, introduce the needle into the middle of the “tent” with the syringe and needle parallel to the pet’s back.
- Once you have administered the prescribed amount (eg. 100-200 ml), remove the needle with the fluid still flowing.

- Turn off the flow via the stopper and recap your needle. This prevents “backflow” of contaminants into the administration set and fluid bag.
- Replace the used needle with a new needle and keep it capped until the next administration.
- Repeat steps 3-12 with each administration. Changing bags as the fluid is expended.


